"Time monsters are created by major time glitches. Many of these creatures have poor eyesight and intelligence and only attack if you get close. But workers cannot afford to ignore them—you must defeat every monster in an area."
— Time Factory Worker's Safety Guide, Blinx: The Time Sweeper
Time Monsters are major time glitches. Most will only attack if approached. When defeated, they become minor time glitches, Time Crystals. Some will only take one hit to defeat, others take multiple hits.
These are the simplest of all the time monsters. They are very near-sighted, slow, and are only dangerous in small spaces. When they approach Blinx, they can turn invincible for a split-second and make a very quick jump to try to hit him. The jump is easy to avoid, though.
Green Chrono-Blobs, which first appear in Time Square Stage 1, only have 1 HP. Yellow Chrono Blobs, appearing first in Deja Vu Canals Stage 1, have 2 HP. Purple Chrono Blobs, which do not appear until Mine of Precious Moments Stage 1, have 3 HP. Chrono Blobs, however, do not appear in Everwinter or later.
Strategy: Fire from far away and be sure to leave yourself room to maneuver.
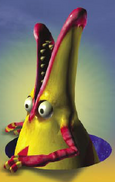
Spiker
Spiker
The Spiker is similar to a Chrono Blob, but much stronger. Unlike Chrono Blobs, which are solid colored, Spikers have a colored stripe on themselves. They can see Blinx from a distance, and will unleash their spikes and roll toward him when they notice him. When using their spike attack, Spikers are invulnerable.
Spikers come in four color combinations. The blue and green Spikers, which first appear in Time Square Stage 2, only have 1 HP. The green and purple Spikers, first appearing in Temple of Lost Time Stage 1, have 2 HP. The yellow and purple Spikers, which appear as early as Forgotten City Stage 2, have 3 HP. The purple and blue Spikers, which first appear in Everwinter Stage 1, have 4 HP.
Strategy: Attack from a distance, and jump over them if they roll toward you. Pause or Slow controls are the most useful. If in a room with multiple Spikers, attack them one at a time so the others will not notice you.
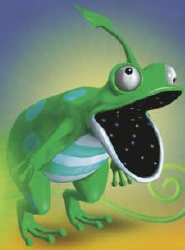
Keropper
Keropper
Keroppers are large frog-like time monsters which will eat any trash that is shot toward their front side. They will swallow anything that is shot at their front side. They grow larger when they swallow trash, but they also move more slowly. They will take damage, however, if shot in the back. Also, they will take 2 HP of damage if they swallow a bomb.
Green Keroppers, which first appear in Deja Vu Canals Stage 1, have 2 HP, while Red Keroppers, debuting in Forgotten City Stage 1, have 3 HP.
Extremely large Keroppers, known as Kerogons, appear as bosses in two rounds. The boss of Deja Vu Canals is a green Kerogon, and the boss of Mine of Precious Moments is a much more powerful brown Kerogon.
Strategy: It is easier to hit a Keropper's back from a distance, as they will not try to face you if you are far enough away from them. Also, be sure to search for bombs when in an area near a Keropper. Most areas with Keroppers contain several bombs.
Octoballoon
Octoballoon
Octoballoons look like octopus balloons. When Blinx approaches them, they will float down and try to shoot him with trash. They are still easily defeated by jumping and then shooting. Octoballoons are usually only difficult in tight spaces or if there are more than two of them. There are two colors of octoballoons: blue, which take one hit to defeat, and the red, which take two hits to defeat. They appear in every world apart from Momentopolis.
Strategy: Keep your distance, and jump up before shooting.
Tip: If you are running low on trash wait a few seconds till they come down to take a shot, time your jump or move out of the way, you can collect the trash they shot when it hits the wall.
Dust Herder
Dust Herder
These guys stand on balls and carry a magic wand. Their wand can shoot trash at Blinx, but they are still really easy to defeat. They come in three colors: blue, which take one hit to defeat, green, which take two hits, and red, which take three hits. Their balls can be used as trash when defeated, and are worth 100 gold if kept until the end of the level. They appear in every world apart from Momentopolis, with large versions appearing as bosses for Time Square and Forgotten City.
Strategy: Don't fret, take them on and take aim. They are slow to react. After they get up, they will instantly fire so be careful!
Tip: Like the octoballoon you can use the trash they shot to your advantage, just move or time your jump to move out of the oncoming trash.
Molegon
Molegon
These guys hide underground and cannot be attacked while they are, but they pop out sometimes to look around. A dust cloud is visible above them when they are underground, and it tells where they are. They can attack Blinx by popping out of the ground while they are right under him and biting at him. Molegons take two hits to defeat. In later levels, after they are hit once, they will only pop out of the ground when they are right under Blinx. But Blinx can jump away right before the Molegon pops out and attack the Molegon, defeating it. They appear in Hourglass Caves, Temple of Lost Time, and Mine of Precious Moments. Two stronger versions of this monster appear in the Hourglass Caves and Everwinter as bosses.
Strategy: Watch your feet and when you hear a sound, jump and fire!
Water Spirit
These guys look like slugs. After ten shots, they turn in to a lizard-like creature. The lizard dies after one more hit. If Blinx has the TS-2000 Flame Sweeper, the Water Spirit will turn into the lizard after the first hit. They appear in Forgotten City and Everwinter.
Strategy: Take out all the other enemies around it. Don't get locked in cornors and watch for cliffs. The hardest thing about fighting these guys is that you might run out of trash!
Combustasaur
Exactly like the Water Spirit, but with fire instead and a tall, dragon-like appearance. They turn into a lizard after ten shots, and the lizard dies after one more hit. If Blinx has the TS-2000 Freeze Sweeper, the Combustasaur will turn into the lizard after the first hit. The main differences the between Combustasaur and the Water Spirit is that it is much slower than the Water Spirit, and shoots fireballs at Blinx with great accuracy. They appear in Mine of Precious Moments and Forge of Hours.
Strategy: Same as the Water Spirit. Just take it out from a distance and look out for its fireballs!
Gatekeeper
When Blinx approaches a pink door with a blue heart smiley face, the Gatekeeper will fly out of the door. After the monster is hit enough times, it will turn translucent and go back into the door, making the door disappear. They come in green, which take two hits, and pink, which take three hits. They appear in Forgotten City, Mine of Precious Moments, and Everwinter.
Strategy: Don't stand in front of the Gatekeeper when it comes out. Also, make sure the Gatekeeper doesn't ram you.
Typhoon
These seahorse-like monsters spin around and form a mini-tornado which can make Blinx dizzy, and let enemies hit him. They cannot be hit when spinning around (except under a Pause Time Control). It's best to always kill these guys first when encountering them. They are found in Everwinter and Forge of Hours.
Strategy: Take it out first. It will hold you in your place for the enemies to kill you or twist you off a cliff. Simply avoid if you can't take it out.
Golem
These are the slimy clock-faced robots. When Blinx enters a certain room, they will form out of different pieces. If Blinx uses a Pause and enters the room before the monster forms, he can sweep up the parts (and use them as ammo) that form this monster to make the monster weaker. They take three hits to defeat, but for each piece Blinx sweeps up, it subtracts a hit. If all three pieces are sweeped up, the monster will just die right there without forming. In later levels, they have two balls revolving in circles around them. If Blinx hits one of the balls, a clock will fall out and can be used as ammo. Pieces of a Golem and clocks are worth 100 gold if kept until the end of the level. They appear in Temple of Lost Time and Forge of Hours, with larger, more powerful versions also appearing in these two stages.
Strategy: Suck up the pieces and make sure it doesn't ram you.
Very similar to the Spiker of the last game. The main difference is that the Spiker can now be hit when it's ramming with a spike attack. This makes fighting the monster much easier than before.
Octoballoon
Exactly the same as the last game's Octoballoon, except these versions can perform a spinning attack if the player comes too close to it.
Kerofish
It has the same concept as the last game, with a name change from Keropper. It's a combination of a frog and fish. It moves much faster now. It still eats any trash (or bullets) shot infront of it. It will take damage from a bomb or some sort of explosive (grenade, missile, firework, mine, etc). And it takes damage when trash or bullets is shot on the back or sides.
Speed Monster
This guy is usually found in a confined room, moving at lightning fast speeds in all directions. It can only be shot when a pause or slow Time Control is used. Pause is the better choice, because even under a slow Time Control, it still moves fast.
Demon Monster
This is a big time monster which posses incredible strength. It can slam the floor with its fist and create a shock wave to damage the player. However, it is frail and taken out with a single shot. It also takes a while to notice the player, so it's an easy monster to defeat.
Skeleton Monster
It's a ghostly skeleton monster. It takes two shots to defeat it. First shot is to knock it down, and the second one is to hit the bouncing skull while it's dizzy. However, the player's melee attack can also be used to knock it down, thus saving a piece of trash for the player.
Multiplying Lizard
A lizard who has the ability to multiply itself when defeated. It takes only one shot to defeat it. It attacks by ramming at high speed like a Spiker. When hit, if it's green, then it is defeated. If it is red, then it multiplies itself into two. The player can keep multiplying and defeating it, which is a great way to earn extra time crystals. The Multiplying Lizard is not seen alot.
Flying Lizard
A flying lizard who uses balloons/orbs to defend itself. It acts exactly like the octoballoon, except it notices the player from further away and has better accuracy. It is frail and taken down with one shot.
Time Dragon
This is a Pause Time Barrier monster. When encountered, it is sleeping. It wakes up if the player comes too close, however. When awake, it has the ability to pause time (including the player). It dies to a single shot, but only under a pause time control.


